Yes — for minor dips, small rooms, and concrete subfloors that are mostly flat, you can level a floor yourself with a bag of self-levelling compound and a couple of hours. For badly sloping slabs, structural movement, or timber subfloors that flex, it’s a job for an installer. Here’s how to tell which one you’re dealing with, and how to do it properly if you’re going DIY.
How flat does the floor actually need to be?
Most floating floor systems — laminate, hybrid, SPC, click-engineered timber — specify a tolerance of 3 mm over a 2 m span. Glue-down luxury vinyl planks are tighter at around 2 mm over 2 m. Carpet is the most forgiving and will sit happily over a 5-6 mm dip. Tiles are the strictest: a hump or hollow under tile shows up as a lippage problem along the grout line.
Before you decide whether to DIY, get a 2 m straightedge or a long spirit level on the floor. Slide it across the room in both directions and use a tape measure to read the gap under the bar. If your worst dip is under 5 mm and the rest of the floor is reasonable, you’re in DIY territory. If it’s 10-20 mm out across a single room, or you’ve got a slope from one end of the slab to the other, the prep is bigger than a homeowner pour can fix.
What you can DIY, and what you can’t
Realistic DIY scope:
- Filling localised hollows under 10 mm with a patching compound.
- Smoothing a concrete slab that’s mostly flat but has minor undulations across a room up to about 25 m².
- Feathering out trowel marks or old adhesive ridges.
Where to call an installer or floor preparer:
- Slabs that slope more than 10 mm across a 3 m span (you’re into deep-fill territory and the cost of compound climbs fast).
- Suspended timber floors that flex underfoot — the issue is structural, not surface, and pouring compound onto a flexing floor will just crack it.
- Slabs with rising damp or efflorescence — those need a moisture barrier or grinding before any compound goes down.
- Bathroom or laundry preps that need a fall toward a drain.
DIY method 1: self-levelling compound
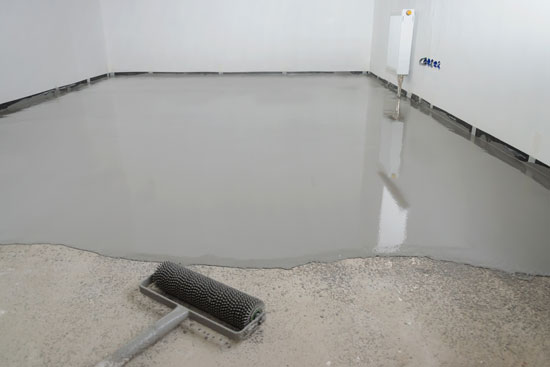
Self-levelling compound is a cement-based powder you mix with water and pour onto the floor. It flows out and finds its own level, so you don’t have to trowel it perfectly flat — you just help it spread and let gravity do the rest. Bostik Ultra Level C500 and Cemimax DL59 are two we sell in the showroom; both are pumpable, both work on concrete, and both need a primer down first.

The basic process:
- Vacuum the slab clean. Any grit or dust will create a weak bond.
- Roll on the manufacturer’s primer and let it dry to the recommended time (usually 1-3 hours).
- Mix the compound in a clean bucket with a paddle on a corded drill — get the water ratio exactly as specified on the bag, no eyeballing.
- Pour from one corner outward, working in 5-10 m² sections. You’ve got about 20-30 minutes of working time per batch.
- Help the flow with a smoothing trowel or gauge rake — don’t trowel it flat, just spread it.
- Spike-roll the surface within 5 minutes of pouring to release trapped air bubbles.
- Wait the full cure time on the bag (typically 4-24 hours before light foot traffic, longer before laying floor over it).
DIY method 2: patching compound for localised dips
If your floor is mostly flat with one or two hollows, a trowel-applied patching compound is faster and cheaper than a full pour. It’s a stiffer, non-flowing version of the same cement-based product. Apply with a steel trowel, feather the edges out past the dip, and sand or scrape the high points back once it’s set. This is the right approach for filling a 4-6 mm hollow under a doorway or a 50 mm-wide trench where a wall used to be.
Tools and prep you’ll actually need
- A 2 m straightedge or long spirit level — the single most important tool, both before and after the pour.
- A clean 20 L bucket and a paddle mixer on a corded drill (cordless drills run flat fast at the torque required).
- A spike roller with a 600 mm-plus handle.
- A primer that matches your compound brand. Don’t mix and match — primer and compound are designed as a pair.
- Painter’s tape and 50 mm timber strips to dam the perimeter and any door openings.
- Gloves, safety glasses, and a respirator while mixing dry powder.
Common mistakes
- Skipping the primer. Compound poured on bare concrete will draw water out of the mix too fast, weakening the bond and creating shrinkage cracks.
- Adding extra water to extend working time. The mix gets weaker, dustier, and prone to crumbling.
- Pouring over a flexing timber subfloor. Fix the joist or sheet flex first; otherwise the compound cracks within months.
- Forgetting expansion provision around the perimeter. Leave a clean edge so the floor above can move — cover our notes on expansion gap requirements before you finalise the layout.
- Pouring without checking the room is square. Use the 3-4-5 rule to set chalk lines first if you’re going to mark out perimeter dams.
When to bring in a pro
Floor preparation is its own trade. A floor preparer with a pump-mix rig can pour a 50 m² slab in an hour, get the surface flatter than a DIY trowel job, and grind back any high spots with a planetary grinder before they pour. If you’re laying timber, herringbone, or anything where a 2 mm hump shows up as a visible flaw, the prep cost is worth it. The same goes if you’ve got moisture in the slab — pouring compound over wet concrete just locks the water in.
For most click-system floors over a reasonable concrete slab, though, a weekend with a bag of compound is a fair fight. If you’re laying a floating floor on top, the compound also gives you a clean, sealed substrate — see our notes on whether you can lay vinyl on a concrete floor and what underlay for vinyl flooring the install needs.
The short answer
Check the floor with a 2 m straightedge first. Under 5 mm out across a 2 m span on a clean, dry concrete slab — DIY with self-levelling compound is genuinely doable, and the result will be flat enough for any floating floor. Bigger than that, or anything involving timber subfloors, structural slope, or moisture, hand it to a floor preparer. The cost of getting it wrong shows up the day you lay the floor and every day after.